 Add My Company
Sign In

NB. 'X' in the model number to be replaced with A, B, C, D, E, or F as appropriate for the desired insert. See the inserts illustration and listing on the datasheet.
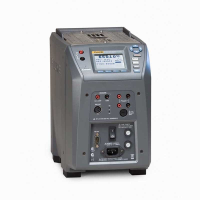
The Fluke 9144-X-P Field Metrology Well extends high performance to the industrial process environment by maximising portability, speed, and functionality with little compromise to metrology performance. The “Process” version (“9144-X-P”) combines the heat source with a built-in readout eliminating the need for the technician to take two instruments to the field.
FEATURES
Temperature Range: 50 °C to 660 °C (122 °F to 1220 °F).
Process Electronics version.
Lightweight, portable, and fast.
Cool to -25°C in 15 minutes and heat to 350°C in 15 minutes.
Built-in two-channel readout for PRT, RTD, thermocouple, 4-20 mA current.
True reference thermometry with accuracy to +0.01°C.
On-board automation and documentation.
Fluke Metrology Wells Introduction
Fluke 9144-X-P Specifications
Base Unit Specifications
Temperature range at 23°C
50°C to 660°C (122°F to 1220°F).
Display accuracy
+0.35°C at 50°C
+0.35°C at 420°C
+0.5°C at 660°C.
Stability
+0.03°C at 50°C
+0.04°C at 420°C
+0.05°C at 660°C.
Axial uniformity at 40 mm (1.6 in)
+0.05°C at 50°C
+0.35°C at 420°C
+0.5°C at 660°C.
Radial uniformity
+0.02°C at 50°C
+0.05°C at 420°C
+0.10°C at 660°C.
Loading effect (with a 6.35 mm reference probe and three 6.35 mm probes)
+0.015°C at 50°C
+0.025°C at 420°C
+0.035°C at 660°C.
Hysteresis
0.1.
Operating conditions
0°C to 50°C, 0% to 90% RH (non-condensing).
Environmental conditions (for all specifications except temperature range)
13°C to 33°C.
Immersion (well) depth
150 mm (5.9 in).
Insert OD
24.4 mm (0.96 in).
Heating time
15 min: 50°C to 660°C.
Cooling time
25 min: 660°C to 100°C
35 min: 660°C to 50°C.
Resolution
0.01°.
Display
LCD, °C or °F user-selectable.
Size (H x W x D)
290 x 185 x 295 mm (11.4 x 7.3 x 11.6 in).
Weight
7.7 kg (17 lb).
Power requirements
100 V to 115 V (+10%), 50/60 Hz, 1400 W 230 V (+10%), 50/60 Hz, 1800 W.
Computer interface
RS-232 and 9930 Interface-it control software included.
-P Specifications
Built-in reference thermometer readout accuracy (4-wire reference probe)1
+0.010°C at -25°C
+0.015°C at 0°C
+0.020°C at 50°C
+0.025°C at 150°C
+0.030°C at 200°C
+0.040°C at 350°C
+0.050°C at 420°C
+0.070°C at 660°C
Reference resistance range
0 ohms to 400 ohms.
Reference resistance accuracy2
0 ohms to 42 ohms: +0.0025 ohms 42 ohms to 400 ohms: +60 ppm of reading.
Reference characterizations
ITS-90, CVD, IEC-751, Resistance.
Reference measurement capability
4-wire.
Reference probe connection
6-pin Din with Infocon Technology.
Built-in RTD thermometer readout accuracy
NI-120: +0.015°C at 0°C
PT-100 (385): +0.02°C at 0°C
PT-100 (3926): +0.02°C at 0°C
PT-100 (JIS): +0.02°C at 0°C.
RTD resistance range
0 ohms to 400 ohms.
RTD resistance accuracy2
25 ohms to 400 ohms: +80 ppm of reading
0 ohms to 25 ohms: +0.002 ohms.
RTD characterisations
PT-100 (385),(JIS),(3926), NI-120, Resistance.
RTD measurement capability
4-wire RTD (2-,3-wire RTD w/ Jumpers only).
RTD connection
4 terminal input.
Built-in TC thermometer readout accuracy
Type J: +0.7°C at 660°C
Type K: +0.8°C at 660°C
Type T: +0.8°C at 400°C
Type E: +0.7°C at 660°C
Type R: +1.4°C at 660°C
Type S: +1.5°C at 660°C
Type M: +1.4°C at 660°C
Type L: +0.7°C at 660°C
Type U: +0.75°C at 600°C
Type N: +0.9°C at 660°C
Type C: +1.1°C at 660°C
TC millivolt range
-10 mV to 75 mV.
Voltage accuracy
0.025% of reading + 0.01 mV.
Internal cold junction compensation accuracy
+0.35°C (ambient of 13°C to 33°C).
TC connection
Small connectors.
Built-in mA readout accuracy
0.02% of reading + 2 mV.
mA range
Cal 4-22 mA, Spec 4-24 mA.
mA connection
2 terminal input.
Loop power function
24 V DC loop power.
Built-in electronics temperature Coefficient (0°C to 13°C, 33°C to 50°C)
+0.005% of range per°C.
1. The temperature range may be limited by the reference probe connected to the readout. The Built-In Reference Thermometer Readout Accuracy does not include the sensor probe accuracy. It does not include the probe uncertainty or probe characterisation errors.
2. Measurement accuracy specifications apply within the operating range and assume 4-wires for PRTs. With 3-wire RTDs add 0.05 ohms to the measurement accuracy plus the maximum possible difference between the resistances of the lead wires.
For more information on Fluke 9144-X-P Process Field Metrology Well talk to Cuthbertson Laird Group
Enquire Now
List your company on FindTheNeedle.

