 Add My Company
Sign In

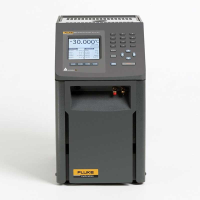
Fluke’s Hart Metrology Wells (9170, 9171, 9172, and 9173) are designed to be stable heat sources that can be used in a laboratory or field environment. With a calibrated display and an optional built-in reference thermometer input (designated with “-R”), Metrology Wells may also be used as a reference standard.
If you need more depth, the Fluke 9171 provides 203 mm (8 in) of immersion over temperatures from -30 °C all the way to 155 °C with full-range stability of +0.005 °C. Just like the 9170, this dry-well has exceptional axial and radial uniformity. The display of the 9171 is calibrated to an accuracy of +0.1 °C over its full range.
The low temperature produced by the Fluke 9171 is available in normal room conditions, delivering outstanding performance making it ideally suited to pharmaceutical applications and others. The well can be ordered with any one of several inserts to cater for most probe sizes and the inserts are interchangeable.
The LCD on the front panel of the Fluke 9171 allows direct viewing of the control temperature (actual well temperature), reference thermometer temperature, heating or cooling power, current set-point information and current program information. The temperature displayed is either in °C or °F. The displayed temperature units can easily be changed by pressing the C/F key on the front panel.
Any of six standard inserts may be ordered with each unit, accommodating a variety of metric- and imperial-sized probe diameters. Please see 9171 datasheet for options.
FEATURES:
Metrology Well, -30 °C to 155 °C, w/INSX.
Best-performing industrial heat sources (accuracy, stability, uniformity) in the world.
Immersion depth to 203 mm (8 in).
Optional ITS-90 reference input reads PRTs to +0.006 °C.
Fluke 9171 Specifications
Range (at 23°C ambient)
-30°C to 155°C (-22°F to 311°F).
Display accuracy
+0.1°C full range.
Stability
+0.005°C full range.
Axial uniformity
+0.025°C at -30°C
+0.02°C at 0°C +0.07°C at 155°C.
Radial uniformity
+0.01°C full range.
Loading effect (with a 6.35 mm reference probe and three 6.35 mm probes)
+0.005°C at -30°C
+0.005°C at 0°C
+0.01°C at 155°C.
Hysteresis
0.025°C.
Well depth
203 mm (8 in).
Resolution
0.001°C.
Display
LCD, °C or °F, user-selectable.
Key pad
Ten key with decimal and + button. Function keys, menu key, and °C / °F key.
Cooling time
30 min: 23°C to -30°C
25 min: 155°C to 23°C.
Heating time
44 min: 23°C to 155°C
56 min: -30°C to 155°C.
Size (H x W x D)
366 x 203 x 323 mm (14.4 x 8 x 12.7 in).
Weight
15 kg (33 lb).
Power
115 V AC (+10%), or
230 V AC (+10%), 50/60 Hz, 550 W.
Computer interface
RS-232 Interface with 9930 Interface-it control software included.
Traceable calibration (NIST)
Data at -30°C, 0°C, 50°C, 100°C, and 155°C.
Specifications
Built-in Reference Input
Temperature range
-200°C to 962°C (-328°F to 1764°F).
Resistance range
0 Ω to 400 Ω, auto-ranging.
Characterisations
ITS-90 subranges 4, 6, 7, 8, 9, 10, and 11 Callendar-Van Dusen (CVD): R0, a, b, d.
Resistance accuracy
0 Ω to 20 Ω: 0.0005 W
20 Ω to 400 Ω: 25 ppm.
Temperature accuracy
(does not include probe uncertainty)
10 Ω PRTs:
+0.013°C at 0°C
+0.014°C at 155°C
+0.019°C at 425°C
+0.028°C at 700°C
25 Ω and 100 Ω PRTs:
+0.005°C at -100°C
+0.007°C at 0°C
+0.011°C at 155°C
+0.013°C at 225°C
+0.019°C at 425°C
+0.027°C at 661°C
Resistance resolution
0 Ω to 20 Ω: 0.0001 Ω
20 Ω to 400 Ω: 0.001 Ω.
Measurement period
1 second.
Probe connection
4-wire with shield, 5-pin DIN connector.
Calibration
NVLAP accredited (built-in reference input only), NIST-traceable calibration provided.
Fluke 9171 warranty
One-year.
For more information on Fluke 9171 Metrology Well Calibrator talk to Cuthbertson Laird Group
Enquire Now
List your company on FindTheNeedle.

