 Add My Company
Sign In

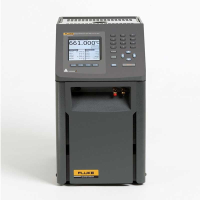
Fluke’s 9173 Metrology Well is designed to be a stable heat source that can be used in a laboratory or field environment. With a calibrated display and an optional built-in reference thermometer input (designated with “-R”), Metrology Wells may also be used as a reference standard.
The LCD display continuously shows many useful operating parameters including the block temperature, block stability, heating and cooling status, and current set-point. The temperature may be easily set with the control buttons to any desired temperature within the calibrator’s specified range.
Any of six standard inserts may be ordered with each unit, accommodating a variety of metric- and imperial-sized probe diameters. Please see the Model 9173 datasheet for options.
FEATURES:
Best-performing industrial heat sources (accuracy, stability, uniformity) in the world.
Immersion depth to 203 mm (8 in).
Optional ITS-90 reference input reads PRTs to +0.006°C.
Temperature range from 50°C to 700°C.
Fluke 9173 Specifications
Range (at 23°C ambient)
50°C to 700°C1 (122°F to 1292°F).
Display accuracy
+0.2°C: 50°C to 425°C
+0.25°C: 425°C to 660°C.
Stability
+0.005°C: 50°C to 100°C
+0.01°C: 100°C to 425°C
+0.03°C: 425°C to 700°C.
Axial uniformity
+0.1°C: 50°C to 100°C
+0.25°C: 100°C to 425°C
+0.4°C: 425°C to 700°C.
Radial uniformity
+0.01°C: 50°C to 100°C
+0.025°C: 100°C to 425°C
+0.04°C: 425°C to 700°C.
Loading effect (with a 6.35 mm reference probe and three 6.35 mm probes)
+0.02°C at 425°C
+0.04°C at 700°C.
Hysteresis
0.07°C.
Well depth
203 mm (8 in).
Resolution
0.001°C.
Display
LCD, °C or °F, user-selectable.
Key pad
Ten key with decimal and + button. Function keys, menu key, and °C / °F key.
Cooling time
235 min: 700°C to 50°C
153 min: 700°C to 100°C.
Heating time
46 min: 50°C to 700°C.
Size (H x W x D)
366 x 203 x 323 mm (14.4 x 8 x 12.7 in).
Weight
15 kg (33 lb).
Power
115 V AC (+10%), or
230 V AC (+10%), 50/60 Hz, 1025 W.
Computer interface
RS-232 Interface with 9930 Interface-it control software included.
Traceable calibration (NIST)
Data at 100°C, 200°C, 350°C, 500°C, and 660°C.
1. Calibrated to 660°C; reference thermometer recommended at higher temperatures.
Specifications
Built-in Reference Input.
Temperature range
-200°C to 962°C (-328°F to 1764°F).
Resistance range
0 Ω to 400 Ω, auto-ranging.
Characterizations
ITS-90 subranges 4, 6, 7, 8, 9, 10, and 11 Callendar-Van Dusen (CVD): R0, a, b, d.
Resistance accuracy
0 Ω to 20 Ω: 0.0005 W
20 Ω to 400 Ω: 25 ppm.
Temperature accuracy
(does not include probe uncertainty)
10 Ω PRTs:
+0.013°C at 0°C
+0.014°C at 155°C
+0.019°C at 425°C
+0.028°C at 700°C
25 Ω and 100 Ω PRTs:
+0.005°C at -100°C
+0.007°C at 0°C
+0.011°C at 155°C
+0.013°C at 225°C
+0.019°C at 425°C
+0.027°C at 661°C
Resistance resolution
0 Ω to 20 Ω: 0.0001 Ω
20 Ω to 400 Ω: 0.001 Ω.
Measurement period
1 second.
Probe connection
4-wire with shield, 5-pin DIN connector.
Calibration
NVLAP accredited (built-in reference input only), NIST-traceable calibration provided.
Fluke 9173 warranty
One-year.
For more information on Fluke 9173 Field Metrology Well talk to Cuthbertson Laird Group
Enquire Now
List your company on FindTheNeedle.

