
Introducing a seamless blend of durability, elegance, and versatility, F.H. Brundle’s aluminium fencing solutions have emerged as a favoured choice among homeowners, landscapers, and contractors alike. Crafted with meticulous attention to detail and a commitment to quality, these fencing systems offer a harmonious fusion of functionality and aesthetic appeal, elevating outdoor spaces to new heights.
Exploring the World of Aluminium Fencing
In the realm of modern fencing solutions, aluminium has carved a niche for itself, surpassing traditional materials with its unparalleled advantages. Unlike wood, which is susceptible to rotting, splintering, and warping, aluminium fencing stands tall, defying the elements with its inherent resistance to corrosion and weathering. Its lightweight nature belies its remarkable strength, ensuring a long-lasting investment that withstands the test of time.
One of the most compelling aspects of aluminium fencing is its low-maintenance requirements. Unlike wooden fences that demand regular staining, painting, or sealing, aluminium fencing requires only occasional cleaning with mild soap and water to maintain its pristine appearance. This attribute not only saves time and effort but also contributes to cost-effectiveness over the long run.
Moreover, aluminium fencing offers a versatile canvas for creativity, with a diverse range of styles, finishes, and design options to complement any architectural aesthetic. From contemporary sleek lines to rustic charm, these fencing systems can seamlessly integrate with your property’s unique character, enhancing its curb appeal and elevating its overall value.
Understanding the F.H. Brundle Advantage
As a leading supplier of aluminium fencing products in the UK, F.H. Brundle has established itself as a trusted name in the industry. Their commitment to quality is evident in every product they offer, ensuring that customers receive fencing systems that not only meet but exceed their expectations.
With an extensive range of options, including light welded wire meshes to heavy industrial wire mesh panels, F.H. Brundle caters to a wide array of applications, from residential to commercial and industrial settings. Whether you’re seeking a decorative touch for your garden or a robust barrier for your business premises, their product lineup has something to suit every need.
Choosing the Right Aluminium Fencing Solution
Before embarking on your fencing project, it’s crucial to assess your specific requirements and preferences. Consider factors such as the desired level of privacy, security, and aesthetic appeal. Additionally, evaluate the terrain and any potential slopes or curves that may influence the installation process.
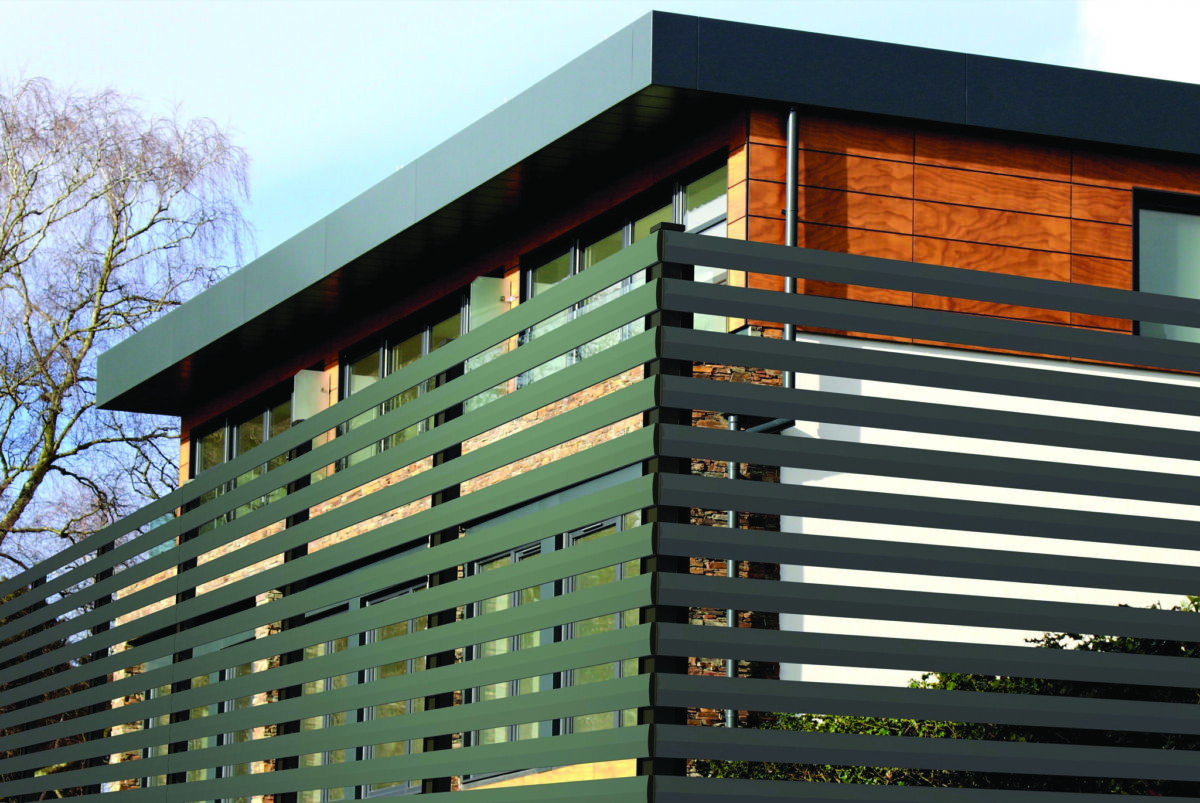
F.H. Brundle’s diverse range of aluminium fencing styles offers a wealth of options to explore. From the realistic wood-effect Breeze fencing system to the sleek and contemporary Convex slats, each design caters to unique tastes and architectural styles.
For those seeking a traditional yet modern touch, the Stripe fencing boards with their double-sided design allow you to choose between a grooved effect or a flat, contemporary look. Alternatively, the Elements board system offers endless possibilities for creating ultra-modern and unique styles, combining various materials, finishes, and design elements.
If privacy is a priority, the Connect system is an excellent choice, providing stunning privacy fencing with its 6m long aluminium fence boards available in a range of colours and finishes. For those seeking functionality and beauty, the Parallel fence boards can be seamlessly integrated into steel gate frames, creating a harmonious blend of style and practicality.
Preparation: The Key to Successful Installation
Proper preparation is the foundation of a successful aluminium fencing installation. Before breaking ground, it’s essential to familiarise yourself with local fence codes and regulations, ensuring compliance with all relevant guidelines.
Additionally, marking underground utilities is crucial to prevent any accidental damage during the digging process. Consulting with a professional surveyor or contacting the appropriate authorities can provide invaluable guidance in this regard.
Once the groundwork is complete, it’s time to measure and plan the fence area, clearing any obstructions that may hinder the installation process. This step also involves reserving any necessary tool rentals or arranging for the delivery of materials, such as quick-setting concrete, if required.
Essential Tools and Materials
To ensure a smooth and efficient installation process, assembling the right tools and materials is paramount. A comprehensive toolkit should include a post-hole digger, a shovel, a level, a hacksaw, a tape measure, an electric screwdriver or a cordless drill with the appropriate bit, and a wheelbarrow.
In terms of materials, F.H. Brundle offers a wide range of options, including self-colour, pre-galvanised, and galvanised stainless steel grades 304 and 316, as well as PVC welded mesh. Additionally, you’ll need ground stakes, string lines, and quick-setting concrete or gravel, depending on your specific installation requirements.
Step-by-Step Installation Guide
With the necessary preparations complete and the required tools and materials at hand, it’s time to embark on the installation journey. Follow this step-by-step guide to ensure a seamless and professional-grade installation:
- Layout and Marking
Begin by indicating the locations for end posts, corner posts, and gate posts using wooden stakes. Connect these stakes with a string line, creating a visual guide for the fence line. Ensure that the string line is taut and accurately represents the desired path of your fence.
- Hole Digging
Using the post-hole digger, dig holes that are 4-6 inches wide and 24-42 inches deep, depending on the frost line in your area. The depth of the holes is crucial for ensuring the stability and longevity of your fence. Consult local guidelines or seek professional advice if unsure about the recommended depth for your region.
- Post Installation
Start by attaching one section of the fence to the post by sliding the notched rails of the panel into the holes of the post. Secure the panel to the post using self-tapping screws, ensuring a tight and secure fit.
Next, place the post in the first hole, ensuring it is plumb (perfectly straight up) using a level. Mix the quick-setting concrete according to the manufacturer’s instructions and pour it into the hole, leaving approximately 2 inches from the top. Fill the remaining 2 inches with packed dirt and press tightly to help hold the post in place.
Repeat this process for each post, following the string line as your guide. If your fence line ends at a corner, ensure that the last post is a corner post with holes facing the direction of the next fence line.
- Fence Panel Installation
Once the posts are securely in place, it’s time to install the fence panels. Slide the notched rails of the panel into the holes of the posts, securing them with self-tapping screws as you did with the initial post.
If a section of the fence line is not divisible by the standard panel width, you may need to cut the panels to fit. Use a hacksaw for this purpose, ensuring precise measurements to achieve a seamless fit.
- Gate Installation
After completing the fence panels, it’s time to install the gate(s). Ensure that the gate posts are plumb and the concrete has fully cured, typically overnight or after two days.
Install the hinges on the gate frame, following the manufacturer’s instructions. Typically, the hinges should be positioned 6 inches down from the top and 6 inches up from the bottom, using the provided screws.
Center the gate in the opening and secure it with one screw in each hinge, allowing for final adjustments. Install the latch mechanism and ensure that the gate swings smoothly before securing the remaining hinge screws.
- Final Touches
Once the installation is complete, take a step back and admire your handiwork. Ensure that the fence follows the grade and has a smooth, flowing appearance. Make any necessary adjustments to the posts or panels while the concrete is still curing.
If you encounter any slopes or curves in your fence line, F.H. Brundle’s aluminium fencing systems offer racking and stepping options to accommodate these variations seamlessly.
Racking and Stepping: Conquering Slopes and Curves
Uneven terrain or sloping landscapes need not be a barrier to achieving a flawless aluminium fencing installation. F.H. Brundle’s fencing systems are designed to adapt to these challenges through racking and stepping techniques.
Racking
Most aluminium fence styles from F.H. Brundle can be racked or raked by pivoting on the screws that attach the pickets to the rails. This allows for an average of 16 inches of racking per 6-foot run of fence, ensuring a smooth and continuous appearance even on sloped surfaces.
For particularly steep slopes, F.H. Brundle offers a custom “Double Punch” option, increasing the racking capability to 29 inches, depending on the fence style. This service is provided at no additional cost, ensuring that your fencing installation meets the unique demands of your landscape.
Stepping
Certain fence styles, such as the Castle design, are better suited for a stepped installation, also known as “stair stepping.” This technique involves attaching brackets on the opposite blank side of the end posts at the appropriate height dictated by the slope. In cases of extremely steep slopes, F.H. Brundle can provide custom extra-long end posts to accommodate the installation.
By leveraging these innovative techniques, you can achieve a seamless and visually appealing fencing solution that complements the natural contours of your property.
Maintenance and Care: Preserving the Beauty
One of the primary advantages of aluminium fencing is its low-maintenance nature. However, to ensure the longevity and pristine appearance of your investment, it’s essential to follow a few simple care guidelines.
Regular cleaning with mild soap and water is recommended to remove any accumulated dirt, debris, or other substances. Avoid using abrasive cleaners or tools that may damage the surface of the fencing.
Periodically inspect your aluminium fencing for any signs of damage, such as loose boards, dents, or scratches. Address any issues promptly to prevent further deterioration and maintain the structural integrity of your fence.
Depending on the specific fencing system and environmental conditions, you may need to apply a protective coating or wax to maintain the finish and protect it from the elements. Consult F.H. Brundle’s recommendations or seek professional advice for any specific maintenance requirements.
By adhering to these simple maintenance practices, you can enjoy the beauty and functionality of your aluminium fencing for years to come.
Unlocking Elegance with F.H. Brundle
F.H. Brundle’s commitment to quality and customer satisfaction extends beyond their exceptional product range. Their user-friendly ordering process and prompt delivery times ensure a seamless experience from start to finish.
Whether you’re a seasoned DIY enthusiast or embarking on your first fencing project, F.H. Brundle’s expertise and comprehensive range of sizes, thicknesses, and materials guarantee a product that fits your unique requirements.
Elevate your outdoor spaces with the unparalleled elegance and durability of F.H. Brundle’s aluminium fencing solutions. Embrace the beauty of low-maintenance living and enjoy the peace of mind that comes with a long-lasting investment in your property’s aesthetic appeal and security.
For more information on How to Install F.H. Brundle Aluminium Fencing: Step-by-Step Guide for DIY Enthusiasts talk to F H Brundle